
I have to say, I love this quilt! This has been one of my favourites to make (and now look at!) for quite a while. I'm not sure whether this is because it's of the sunshine, or because of the lovely bright colours, but it just makes me happy! I want to hang it on my wall and smile at it every time I walk past.
But it's a present for someone so now I've got to give it away.

Just hope she likes it. As well as the fact that the weather has been so sunny, I made this particular quilt because she's such a sunny person. I always find it's good to make a quilt as personal as possible for the person in mind because then it is usually easier to give it away! Obviously this one needed to be a bit more personal though!
I've seen quite a few sunshine quilts on Pinterest, all of them very similar, but I think this is my favourite:
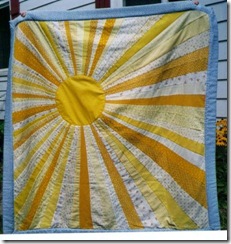
The thing I most love about it is the blue binding, which I've used, and love now, on my quilt. And I also loved breaking into my pile of vintage sheets for mine.
I made it by first sandwiching together the backing fabric (part of an old duvet cover), an old wool blanket and an old plain sheet. I gave them all a good spray with the 505 glue, it's really important to have all 3 layers secure if this method is going to work.
 |
| My 3 layer sandwich, backing facing up here. |
 |
Sew right sides together down one seam before ironing it over flat. |

So now I had all the rays with a roundish hole waiting to be filled in the middle. All my stitching so far had gone through all 3 layers so was already 'quilting' it together pretty well but I wanted lots more quilting on this one so added lots more lines on each section to give more of the 'ray' effect. It worked really well.
 |
| Quilted rays |
I decided I'd like a big round sun on the back too so I appliqued that on next, with a really dense zigzag stitch all the way round the raw edge.
 |
| The round sun on the back, with a dense, orange zigzag stitch around it. |
Then I cut a slightly larger circle for the front so that it would cover the zigzag stitching that had come through to the front. I didn't want more zigzag stitching going through to the back so I turned over a thin hem all the way round my front circle before sewing it on with just a neat machine running stitch.
An easy way to turn over the hem on a circle is to cut a paper template slightly smaller than your fabric (reasonably sturdy paper is good - I used plain wallpaper that the girls have for painting), place it on the wrong side of your fabric and then iron over the wider strip of fabric all the way round. It really is much easier to do it this way with something this size and then you can just machine stitch it down rather than hand applique it, turning it as you go. And obviously it's going to stand up to wear and tear much better this way too.
 |
| My paper template, with the fabric underneath slightly larger. |
 |
| Ironing over a small hem on the paper. |
I was nearly done but wanted to add some more quilting detail to the circle piece too, so I machine stitched a spiral on there. It's been a while since I made a quilt with lots of quilting lines on it and I think this is another reason I like the quilt so much, it really does make a difference to it.

Then the blue binding and it was finished.


Normally I would never make the same quilt more than once (I get bored too easily for that! Plus the fact that there are always so many other quilts to make), but with this one I'm definitely going to have to make another similar at least so that I can put it up on my wall somewhere in the Summer. And I'd love to make a baby quilt along these lines too.
Anyway, this is already a very long post and I haven't even told you how amazing Bruce Springsteen was last night! He's definitely a lesson in growing older, he's 63 and still doing what he clearly loves, surrounded by friends in the band who are clearly very important to him. And not only is he doing it but he's doing it incredibly well, I wish I had half his energy now! Sometimes you hear older singers and all the power and quality in their voices seems to have drained away but that wasn't the case with Bruce at all. And he sang for probably over three and a half hours almost solidly! Amazing! If you ever get a chance, go and see him.
I'll leave you with some of his (completely randomly chosen!) song lyrics, for no other reason than they're going round my head still!
Back tomorrow, Sally.
“Like a river that don’t know where it’s flowing
I took a wrong turn and I just kept going”
“You’ve got to learn to live with what you can’t rise above”
"God have mercy on the man
Who doubts what he's sure of"
"You can't start a fire, worryin' about your little world falling apart"
"Now everyone dreams of a love faithful and true,
But you and I know what this world can do.
So let's make our steps clear so the other may see.
And I'll wait for you...should I fall behind wait for me.”
Have you got any favourite song lyrics, not necessarily Bruce Springsteen, that you feel like sharing?
When I first started quilting in 2001 I made a great niece one of these. I don’t remember how I did it because I sure didn’t know what I was doing, but she’s an adult now and still has and loves that quilt. Thank you for the tutorial. maybe I did it that way, Maybe not, but I’m going to do another one Using your tutorial.
ReplyDeleteI can’t wait to try this!! Thank you for the inspiration! I recognize some of those vintage sheets!!!
ReplyDelete